 If the kitchen has free space, you can make a vertical shelf for rags. This design is very convenient, because in it you can store not only rags, but also household items.
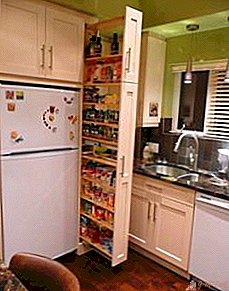
Extendable rag shelf
Designs can be different, depending on the imagination. You can make an angular design. It is possible to make a cabinet with shelves for storage. And you can make a shelf with drawers. The latter is very convenient because you can put various things in different boxes.
Tools and materials
To create such a shelf with your own hands you will need the following tools:
- Tape measure or ruler to measure.
- Pencil or marker for marking.
- Building angle.
- Electric jigsaw or saw.
- Screwdriver.
- Rag.
- Knife.
- Iron.
- Paint.
- Wheels or other parts for drawers. Wheels are also needed for the bottom of the shelf, if we want it to be mobile.
Materials for creating a cabinet can be different. It all depends on the size and design model. Very often, builders combine several materials. As a basis use:
- Laminated plastic.
- Chipboard (both sanded and unpolished).
- Wood.
- Metal-based mesh or wire.

How to make the right measurements
First you need to make a sketch. For this, measurements are made. The size of the structure will depend on the free space. The average height of all structures is from 1 to 1.5 meters. The average depth is about 50 cm. The length of one box should be 3-4 cm less than the depth of the structure, because the thickness of the boards is also taken into account. The average thickness is about 3-6 cm. The average width of the shelf is about 40-50 cm.
Attention! All the above numbers are average. You can do more or less, depending on the amount of free space. Pay special attention to the thickness of the boards, because errors in the calculations can reduce the durability of the structure.

Vertical shelf assembly: step-by-step instructions
In order to assemble a vertical shelf, do the following:
- You need to start with the basics. First of all, it is necessary to mount the wheels to the bottom. We will need 4 wheels. You can choose both rotary and non-rotary options. It all depends on where the shelf will stand. The wheels must be at the edges so that the structure is stable.
- Now you need to install the walls. If you have chosen the option on wheels, you need to fix them so that they do not move during operation. First, make the back wall, and then the side. We drill in them grooves for shelves.
- Now you need shelves. Their number depends on the size of the structure. They can be installed with nails or nuts. Alternatively, you can install 2 small wooden beams on the wall of the shelf, and use them as a shelf holder. Then you can pull them out.
- You can store rags directly on the shelves, or make boxes for them. If you chose the option without drawers, you need to make a door so that dust does not get inside.
- Using construction glue, fix all fasteners and connections.
- Now you need to paint the cabinet and cover it with varnish or primer.
- If necessary, you can install the handle. With its help, it will be more convenient to move the cabinet.
Attention! If the option with drawers was chosen, then we will need to make several more drawers. Their number depends on the size of the shelf.

To create a box, we need:
- Cut out the details. The box consists of a bottom, side walls, rear and front walls of the handle and a facade coating (on the front wall).
- All cut out details need to be processed with sandpaper.
- It is necessary to drill holes in the front, back and side walls. Install the mounts. We get a square.
- Now you need to attach the bottom.
- The next step is the front wall. It can be nailed or glued with building glue.
- The front wall should be covered with paint and varnish.
- Need to attach a pen.
- Place the drawer in the cabinet.
Do-it-yourself design is quite simple. The main thing is to be careful at the design step, because you can make mistakes in it.
Leave Your Comment